April 09, 2015
Installing a storage area network (SAN) on Ubuntu 14.04 LTS
6 comments:
Labels:
san,
storage area network,
ubuntu 14.04
System info: `uname -a` returns: Linux tech 3.13.0-24-generic #46-Ubuntu SMP Thu Apr 10 19:11:08 UTC 2014 x86_64 x86_64 x86_64 GNU/Linux
A storage area network is implemented to access storage device from a remote machine in a way that it appears to be locally attached. This is implemented using Small Computer System Interface (SCSI).
A storage area network consists of:
1. Initiator (client)
2. Target (server)
Installation instructions:
Switch to super user. Use command: sudo -i or else use su root

1. Install iscsitarget (iSCSI: Internet Small Computer System Interface)
Checkout: http://iscsitarget.sourceforge.net/

2. Create a logical unit for storing data
(lun: logical unit number)
We are creating a 1GB file (/root/lun0) for storing data on SAN.
Run "man dd" for more information on dd command.

3. Enable iscsitarget by editing /etc/default/iscsitarget and setting ISCSITARGET_ENABLE to 'true'.

4. Configure ISCSI by editing file: /etc/iet/ietd.conf
Check screenshot for reference.

5. Restart iscsitarget /etc/init.d/iscsitarget (start|stop|restart|...)


sudo fdisk /dev/sdX <---- In our case /dev/sdb is the virtual disk
n (add new partition table)
p (primary partition)
<enter> (enter, enter, enter for default values)
w (write table and exit)
Check screenshot for reference.

6. Format and make a new file system using mkfs on first partition of the virtual disk (/dev/sdX1)

7. Mount the new partition for use:

Check back on "Disks" utility. Your storage area network drive should be ready for use.

Read More
A storage area network is implemented to access storage device from a remote machine in a way that it appears to be locally attached. This is implemented using Small Computer System Interface (SCSI).
A storage area network consists of:
1. Initiator (client)
2. Target (server)
Installation instructions:
Switch to super user. Use command: sudo -i or else use su root
sudo -i
A. Target installation on Ubuntu:
1. Install iscsitarget (iSCSI: Internet Small Computer System Interface)
apt-get install iscsitarget
Checkout: http://iscsitarget.sourceforge.net/
2. Create a logical unit for storing data
dd if=/dev/zero of=/root/lun0 bs=1M count=1024
(lun: logical unit number)
We are creating a 1GB file (/root/lun0) for storing data on SAN.
Run "man dd" for more information on dd command.
3. Enable iscsitarget by editing /etc/default/iscsitarget and setting ISCSITARGET_ENABLE to 'true'.
ISCSITARGET_ENABLE=true
4. Configure ISCSI by editing file: /etc/iet/ietd.conf
Target iqn.2014-04.localhost:target0
    Lun 0 Path=/root/lun0,Type=fileio
    initiator-address 127.0.0.1
(iet: iscsi enterprise target)
Add a new target that points to created lun0 file (/root/lun0)Check screenshot for reference.
5. Restart iscsitarget /etc/init.d/iscsitarget (start|stop|restart|...)
/etc/init.d/iscsitarget restart
B. Initiator configuration on Ubuntu:
2. Discover running instances of SAN target on a remote machine
Use target IP
Run 'man iscsiadmn' for more information on arguments.
iscsiadmn -m discovery -p 127.0.0.1 -t st
Run 'man iscsiadmn' for more information on arguments.
3. Login in to SAN target
iscsiadm --mode node --login --portal 127.0.0.1:3260 --target="iqn.2014-04.localhost:target0"
4. A new storage drive (SAN disk) shows up under /dev. You can view and format this virtual disk using GUI utility called "Disks"
5. Make a new partition table for our virtual disk
Replace /dev/sdX with your virtual disk which is like /dev/sdb in our case.
Replace /dev/sdX with your virtual disk which is like /dev/sdb in our case.
sudo fdisk /dev/sdx
n
p
<enter>
w
n (add new partition table)
p (primary partition)
<enter> (enter, enter, enter for default values)
w (write table and exit)
Check screenshot for reference.
6. Format and make a new file system using mkfs on first partition of the virtual disk (/dev/sdX1)
mkfs.ext4 /dev/sdX1
7. Mount the new partition for use:
mkdir /root/san
mount /dev/sdX1 /root/san
Check back on "Disks" utility. Your storage area network drive should be ready for use.
January 19, 2015
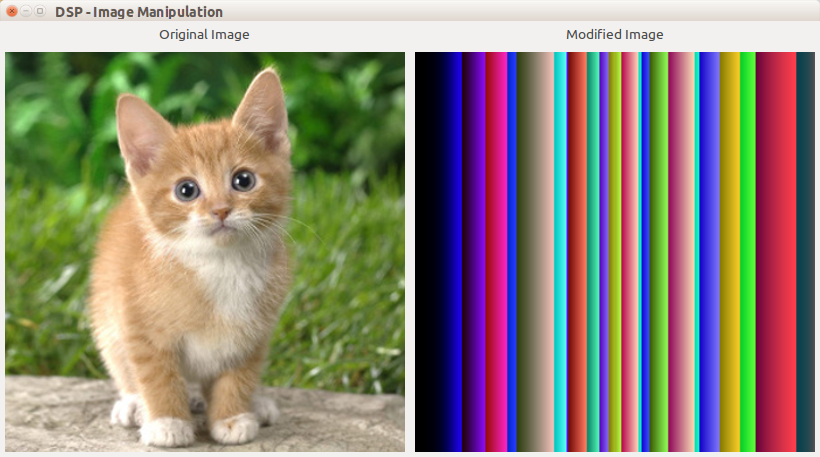
Image processing using MagickCore
This was a fun project that I worked on last weekend. I learned a lot of GTK programming with C and also worked with ImageMagick core C API for image processing/analysis.
App description:
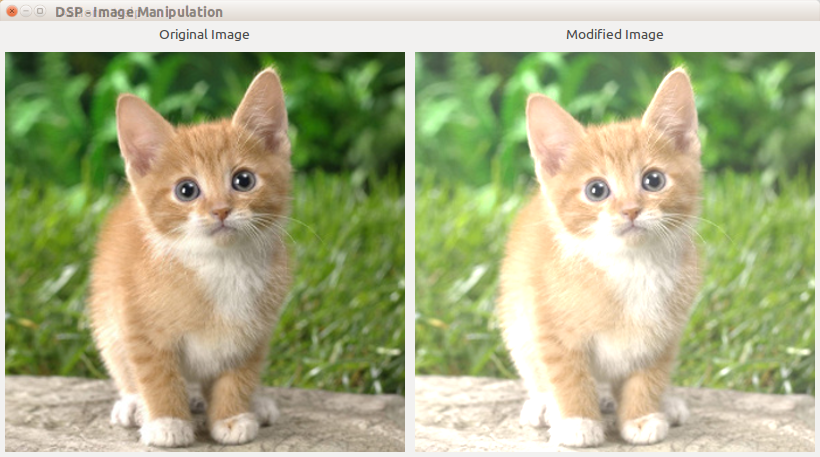
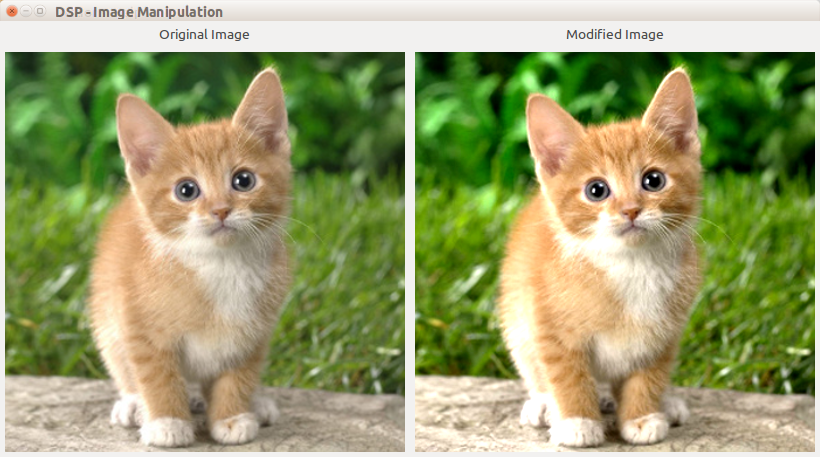
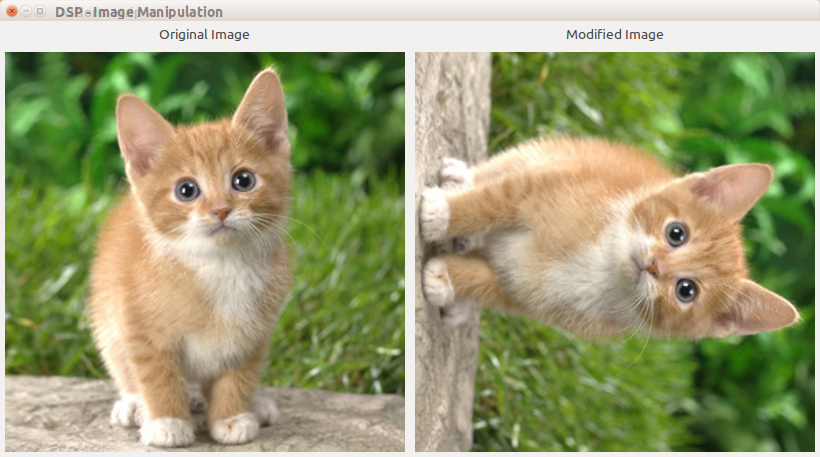
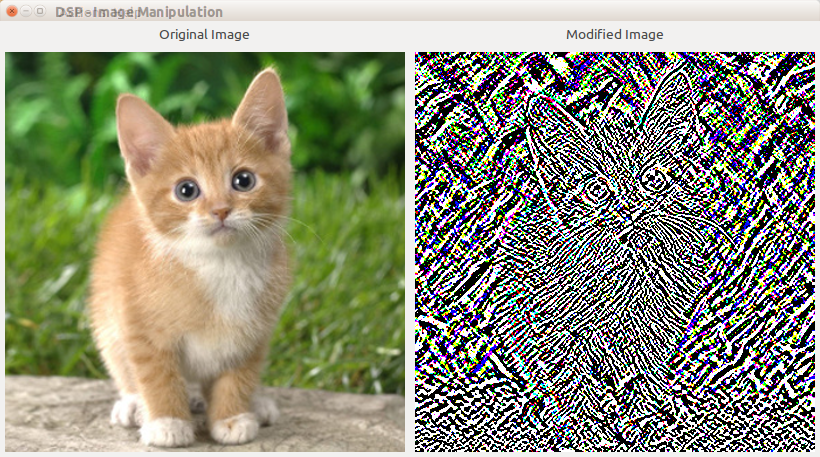
C++ Program with GUI to capture using remotely placed camera and read uncompressed TIFF Image to perform following functions (Menu Driven) Use of Overloading and Morphism is expected. Image Frame1 is used for displaying Original Image and Image Frame 2 is used for displaying the action performed.
• Sharpen the Image
• Convolution(overloading: FFT,Other)
• Blur the Image (Programmable rectangular Seed)
• Programmable image Contrast and Brightness
• Histogram
• Mean and Standard Deviation of image
• Rotate image by programmable angle
Some screenshots:


Frameworks and libs used:
http://www.gtk.org/
http://www.imagemagick.org/script/magick-core.php
Read More
App description:
C++ Program with GUI to capture using remotely placed camera and read uncompressed TIFF Image to perform following functions (Menu Driven) Use of Overloading and Morphism is expected. Image Frame1 is used for displaying Original Image and Image Frame 2 is used for displaying the action performed.
• Sharpen the Image
• Convolution(overloading: FFT,Other)
• Blur the Image (Programmable rectangular Seed)
• Programmable image Contrast and Brightness
• Histogram
• Mean and Standard Deviation of image
• Rotate image by programmable angle
Some screenshots:
Frameworks and libs used:
http://www.gtk.org/
http://www.imagemagick.org/script/magick-core.php
August 19, 2014
Automating menial Browser activity using Selenium
Today I stumbled across a marvelous Framework called Selenium which does browser automation. It lets you programmatically control a web browser session which can be used for automating tests or controlling browser to perform menial works.
Here's a small snippet that I put together for myself just to try out selenium's python bindings. Yes, python is the language of my choice currently! :) Selenium binds of various languages are available on their official website at : http://www.seleniumhq.org/
What this script does is open a third party website: way2sms.com, log me in using my username, password and then send a message to any number of my choice. All of this is done programmatically! So all I've to do is fire up a console and enter my username, password, a mobile number and a message and selenium will handle the rest. Of course, this is just an example and one can use this to perform a variety of tasks, boring or otherwise.
You can install selenium python binding using:
sudo easy_install selenium
Since I hacked this together in hurry, it doesn't include any comments but the code should be self explanatory and easy to follow because all it does is find a web element (like an input box or a button) and send it a sequence of keys ( string value of action keys like RETURN ).
Automating tasks on a third party website requires a bit of inspection of web elements and javascripts, even stylesheet at times. This can be done using built-in web inspectors available with most of the modern browsers like Chrome, Firefox. As of now Firebug is the inspector of my choice.
Keep automating!
Read More
Here's a small snippet that I put together for myself just to try out selenium's python bindings. Yes, python is the language of my choice currently! :) Selenium binds of various languages are available on their official website at : http://www.seleniumhq.org/
What this script does is open a third party website: way2sms.com, log me in using my username, password and then send a message to any number of my choice. All of this is done programmatically! So all I've to do is fire up a console and enter my username, password, a mobile number and a message and selenium will handle the rest. Of course, this is just an example and one can use this to perform a variety of tasks, boring or otherwise.
from selenium import webdriver
from selenium.webdriver.common.keys import Keys
from datetime import datetime

def send(username, password, mobile, message):

  driver = webdriver.Firefox()
  driver.get("http://site25.way2sms.com/content/index.html")

  driver.find_element_by_id("username").send_keys(username)
  driver.find_element_by_id("password").send_keys(password)
  driver.find_element_by_id("loginBTN").send_keys(Keys.RETURN)

  driver.execute_script("goToMain('s')")
  driver.execute_script("loadSMSPage('sendSMS')")

  frame = driver.find_element_by_id("frame")
  driver.switch_to_frame(frame)

  driver.find_element_by_id("mobile").send_keys(mobile)
  driver.find_element_by_id("message").send_keys(message)
  driver.find_element_by_id("Send").send_keys(Keys.RETURN)

  driver.switch_to_default_content()
  driver.close()
You can install selenium python binding using:
sudo easy_install selenium
Since I hacked this together in hurry, it doesn't include any comments but the code should be self explanatory and easy to follow because all it does is find a web element (like an input box or a button) and send it a sequence of keys ( string value of action keys like RETURN ).
Automating tasks on a third party website requires a bit of inspection of web elements and javascripts, even stylesheet at times. This can be done using built-in web inspectors available with most of the modern browsers like Chrome, Firefox. As of now Firebug is the inspector of my choice.
Keep automating!
August 10, 2014
Write a python program for creating virtual file system on Linux environment.
1 comment:
Labels:
projects,
python 2.7,
virtual file system
# Developer: Manish Raj (technoslab@gmail.com)
import shelve, time, sys

class File(object):

    def __init__(self, name, type, parent=None, text=''):
        self.list = []
        self.name = name
        self.type = type
        self.time = int(time.time())
        self.parent = parent
        self.text = text

    def is_file(self, name):
        for node in self.list:
            if node.name == name:
                return True
        return False

    def is_dir(self, name):
        if(self.is_file(name)) and self.get(name).type == 'dir':
            return True
        return False

    def get(self, name):
        for node in self.list:
            if node.name == name:
                return node

    def add(self, name, type, text=''):
        self.list.append(File(name, type, self, text))

    def remove(self, name):
        self.list.remove(self.get(name))

    def rename(self, name):
        self.name = name

    def copy(self, src, dest):
        src = self.get(src)
        self.add(dest, src.type, src.text)

    def stat(self):
        print 'Listing', self.name
        for node in self.list:
            print 'Name:', node.name, '; Created:', node.time, '; Type:', node.type

    def read(self):
        print 'Reading file:', self.name
        print self.text

class FileSystem(object):

    COMMANDS = ['ls', 'mkdir', 'chdir', 'cd', 'rmdir', 'create', 'read', 'rm', 'mv', 'cp', 'help', 'exit']

    def __init__(self):
        self.io = shelve.open('file.sys', writeback=True)
        if self.io.has_key('fs'):
            self.root = self.io['fs']
        else:
            self.root = File('/', 'dir')
        self.curr = self.root

    def mkdir(self, cmd):
        if len(cmd) < 2 or cmd[1] == '':
            print 'mkdir - make directory'
            print 'usage: mkdir <dir_name>'
        else:
            name = cmd[1]
            if self.curr.is_file(name) == False:
                self.curr.add(name, 'dir')
            else:
                print name, ' - already exists.';

    def chdir(self, cmd):
        if len(cmd) < 2 or cmd[1] == '':
            print 'chdir - change directory.'
            print 'usage: chdir <dir_name>'
        else:
            name = cmd[1]
            if name == '..':
                if self.curr.parent is not None:
                    self.curr = self.curr.parent
            elif self.curr.is_dir(name):
                self.curr = self.curr.get(name)
            else:
                print name, ' - invalid directory.'

    def rmdir(self, cmd):
        if len(cmd) < 2 or cmd[1] == '':
            print 'rmdir - remove directory'
            print 'usage: rmdir <dir_name>'
        else:
            name = cmd[1]
            if self.curr.is_dir(name):
                self.curr.remove(name)
                print 'Directory deleted.'
            else:
                print name, ' - invalid directory.'


    def rm(self, cmd):
        if len(cmd) < 2 or cmd[1] == '':
            print 'rm - remove file'
            print 'usage: rm <file_name>'
        else:
            name = cmd[1]
            if self.curr.is_file(name) and not self.curr.is_dir(name):
                self.curr.remove(name)
                print 'File deleted.'
            else:
                print name, ' - invalid file.'

    def ls(self, cmd):
        if(len(cmd) > 1):
            print 'ls - list stats'
            print 'usage: ls'
        self.curr.stat()

    def create(self, cmd):
        if len(cmd) < 2 or cmd[1] == '':
            print 'create - create a file'
            print 'usage: create <file_name>'
        else:
            name = cmd[1]
            self.curr.add(name, 'file', raw_input('Enter file context: '))

    def read(self, cmd):
        if len(cmd) < 2 or cmd[1] == '':
            print 'read - read a file'
            print 'usage: read <file_name>'
        else:
            name = cmd[1]
            if self.curr.is_file(name):
                self.curr.get(name).read()
            else:
                print name, 'invalid file'

    def mv(self, cmd):
        if len(cmd) < 3 or cmd[1] == '':
            print 'mv - rename a file'
            print 'usage: mv <old_name> <new_name>'
        else:
            old_name = cmd[1]
            new_name = cmd[2]
            if self.curr.is_file(old_name):
                self.curr.get(old_name).rename(new_name)
            else:
                print old_name, 'invalid file'

    def cp(self, cmd):
        if len(cmd) < 3 or cmd[1] == '':
            print 'cp - copy a file'
            print 'usage: cp <src> <dest>'
        else:
            src = cmd[1]
            dest = cmd[2]
            if self.curr.is_file(src):
                self.curr.copy(src, dest)
            else:
                print src, 'invalid file'

    def save(self):
        self.io['fs'] = self.root
        self.io.sync()

    def help(self, cmd):
        print 'COMMANDS: mkdir, ls, chdir, rmdir, create, read, mv, cp, rm, exit'

    def exit(self, cmd):
        sys.exit(0)

def main():
    fs = FileSystem()
    while True:
        cmd = raw_input('> ').split(' ');
        method = None
        try:
            method = getattr(fs, cmd[0])
        except AttributeError:
            print 'Invalid command. Type "help".'
        if method is not None and cmd[0] in FileSystem.COMMANDS and callable(method):
            method(cmd)
            fs.save()
        else:
            print 'Invalid command. Type "help".'
main()
August 07, 2014
Capture/Record webcam, desktop and audio under Ubuntu 14.04
1 comment:
Labels:
linux webcam screencasting,
screen recording,
screencast,
ubuntu,
ubuntu 14.04,
vlc

Bash script:
fname=`date +"%d.%m.%Y_%H:%M:%S_%P"`.'_screencast.mp4'
vlc --qt-minimal-view v4l2:///dev/video0 &
vlc --qt-minimal-view screen:// :screen-fps=20 :screen-follow-mouse :live-caching=300 :input-slave=alsa://hw:0,0 :sout="#transcode{vcodec=h264,vb=384,fps=5,acodec=mpga}:duplicate{dst=std{mux=mp4,access=file,dst='$fname'}}" &
These set of commands start two instances of VLC.
The first command fires up a minimal view of VLC with video source "/dev/video0" (the default location of webcamera in most general cases).
The second command starts another minimal VLC instance with video from screen:// (desktop) and audio from default built-in microphone "hw:0,0". Output is encoded and saved in current directory as an mp4 file.
Recording stops when you close VLC instances.
Subscribe to:
Posts (Atom)